Slumped posture and rounded shoulders are the result of our sedentary lifestyle with hours spent looking at computer screens. Although there are many components to correcting this multi-faceted dysfunction, passive stretching of the upper thoracic spine can be useful for addressing the pain that occurs mid-back between the shoulder blades. Gravity can do the work for your client along with towels, pillows and supports to open up the thoracic region. After your client experiences the pleasant and relaxing result of lying supine using this prop arrangement, your client will have a powerful tool to address future discomfort through home care.
A slightly posterior thoracic curve is part of a regular healthy spine, but when this curve becomes exaggerated and rounded, called kyphosis, it compresses the chest toward the pelvis reducing space for the organs and can cause back pain, difficulty breathing and nerve irritation. This rounding can occur through consistently slumped posture over time or may be a result of more serious degenerative issues, such as bone fracturing found in osteoporosis. Severe kyphosis may require the use of back braces or even surgery. The following towel technique is only for mild rounding and should be discontinued if any pain occurs.
Items Needed:
Extra large thick bath towel
Hand towel
Reformer Long Box or equivalent
Small 1″ or 2″ pillow
Optional Items:
Small heating pad
Microwavable neck wrap
Eye cover
I usually set up the client on the Cadillac, but a mat on the floor will also work. Fold the extra large bath towel in half lengthwise and then roll up opposite ends (like 2 tootsie rolls) until one rolls in about 1/3 of the way in and the other side rolls in about 2/3. The rounded ends should meet rolled in together with one side larger creating an evenly sloped angle, rather than two distinct steps of differing heights. This is going to be the main support under the upper thoracic spine, and your client should lie on this towel corresponding approximately to thoracic segments 3-6 with the lower side toward the neck. A good check is to look at the base of the sternum and make sure the towel is situated above the xiphoid process. It is important to place this towel correctly to open the area of sternal concavity found in rounded back posture and to avoid overextension of the lumbar region. I use a small heating pad over this towel to help relax the back muscles.
A pillow should be placed under your client’s head to ensure that the neck is in proper alignment and that the cervical spine does not overextend with the lifting of the chest. The size of the pillow will be determined by the severity of back rounding—the greater the rounding, the bigger the head lift. Any pillow should work, but I like the Balanced Body vinyl head cushions since they come in incremental sizes. The pillow addresses the head height, but does not provide enough cervical support. Fold the hand towel in half lengthwise and then roll it up completely to make a tootsie roll shape. Place this towel under the neck. Be sure you see a gradual descent from the lifted chest to the crown with mild extension of the upper chest to minimize the intensity of holding the position. I sometimes also use a heated microwavable neck wrap going from the back of the neck around the shoulders, but the alignment of the chest, neck and head must be maintained. A lavender-scented eye cover is also nice if your client does not suffer from allergies or claustrophobia.
It is important to elevate your client’s legs to prevent low back pain that could occur from the pressure on the lumbar region in this position. The Reformer Long Box works great for this and should be placed widthwise under your client’s legs comfortably meeting the crease behind the knees. Ask your client what furniture at home might replicate the size of the box (an ottoman, stool, low table or pillows).
Make sure your client is comfortable in this position and make any necessary adjustments—use larger or smaller towels, move towel placement, adjust neck support, etc. Advise your client that if the position becomes uncomfortable to inform you as soon as possible. This open supported position is meant to feel good. Ask your client to breathe deeply creating a little tension in the back muscles and then relax with each exhalation. When the back starts to relax, normal breathing is resumed.
After completing the five-minute period of relaxation, have your client draw both knees into the chest to stretch the low back. When he/she gets up from the table, demonstrate the setup you used, and give any specific instructions related to what you observed to allow your client to replicate the experience at home. Start at home with the same five-minute session and incrementally increase to about 15 minutes provided all goes well. One of my long-time clients uses this towel setup after doing a lot of gardening and housework and says it prevents the muscle tension she used to get after her activities. Between regular private sessions and self-care, she no longer has a pronounced rounded upper back.
Although a Pilates session for a client with poor posture would include exercises to strengthen the core and back extensors, many clients enjoy spending the last five minutes of a session in a recuperative state. I will often use the towel setup along with guided meditation or playing Tibetan Singing Bowls (see “Reward Your Client with Tibetan Singing Bowls“), but peaceful relaxing music works well too. Consistent practice of restful thoracic extension using towels can counteract slumping posture and make it easier for your client to once again straighten up and sit right.
The Hundred (100s) is one of the most widely recognized exercises of the Pilates matwork and also one of the more choreographically complex. It is the first exercise in the matwork series in Joseph Pilates book Return to Life Through Contrology, and its expansive breathing and percussive pumping arms increases oxygen exchange circulating blood and energizing the body for the exercises to follow. The name comes from the hundred pumps achieved through 10 sets of 5 arm pumps during inhalation and 5 arm pumps on exhalation. Breaking down the components of the 100s into individual sections can help students more easily grasp each element as it integrates into the exercise as a whole. This awareness improves mental concentration yielding more fluid and precise movements.
The key elements found in the 100s include quality of breath and its influence on core connection; sequence of abdominal muscle recruitment; and scapular stabilization to power the arms. I have had a few clients who initially expressed a dislike for this exercise, and later changed their minds after integrating the various parts into a more coordinated whole.
BREATHING
The fundamental element in the 100s is breath, and costal (chest) breathing is necessary to perform the 100s effectively. During a normal breath the diaphragm contracts and descends to make more space available in the chest cavity for the lungs to fill and the belly expands. Although this diaphragmatic breath pattern is oxygen-rich, it is ineffective for the 100s since it does not provide adequate support for the lumbar spine when the legs are in the air. The abdominal muscles must be engaged during the inhalation phase of the breath cycle to counterbalance the weight of the legs. This abdominal cinching action reduces available expansion during inhalation to the chest cavity alone. If your client has only experienced diaphragmatic breathing, it may be difficult to maintain the engagement of the transversus abdominis on the inhalation and she may also feel that she does not get enough air with costal breathing alone. Therefore, proper activation of respiratory muscles must first be explored. Select the exercises most accessible and applicable to your client’s needs.
Exercise 1—Lying in Clay
Have your client lie supine and direct her to imagine she is lying in clay or sand. On the inhalation have her visualize that she squishes the ribcage down and wide making a perfect imprint. The breath should also open the sides of the ribcage so the thought of breathing through gills like a fish can also be useful. Breathe in through the nose for 4 counts and out through the mouth for 8 counts.
Exercise 2—Inner Tube
Note that some people use their facilitating respiratory muscles to do the job of the primary respiratory muscles causing the shoulders to lift and lower during each breath. To prevent this, have her imagine that an inner tube is around the chest and to breathe only in this area. You can wrap a scarf around the ribcage for better feedback. Direct her to pull air through her nose and take as many “sniffing” breaths as possible filling up this inner tube and notice the feeling of the muscles engaging in the chest. The last few sniffs will not yield more air intake, but will feel more like intercostal muscles around the ribcage firing. After performing this sniffing breath a few times, go back to normal breathing and she should feel that it is easier to expand the chest and fill up the inner tube.
Exercise 3—One Lung
Have your client imagine that she is breathing only through the right lung. Direct her to feel the breath in the back, front and side of the ribcage. Be sure she feels the expansion of the right ribcage through her focused attention. Then direct her attention to the left side. After feeling each side individually, have her feel the volume available when she breathes into both sides. This exercise demonstrates to your client that she controls muscle activation by thought and that greater attention can lead to an increased reaction.
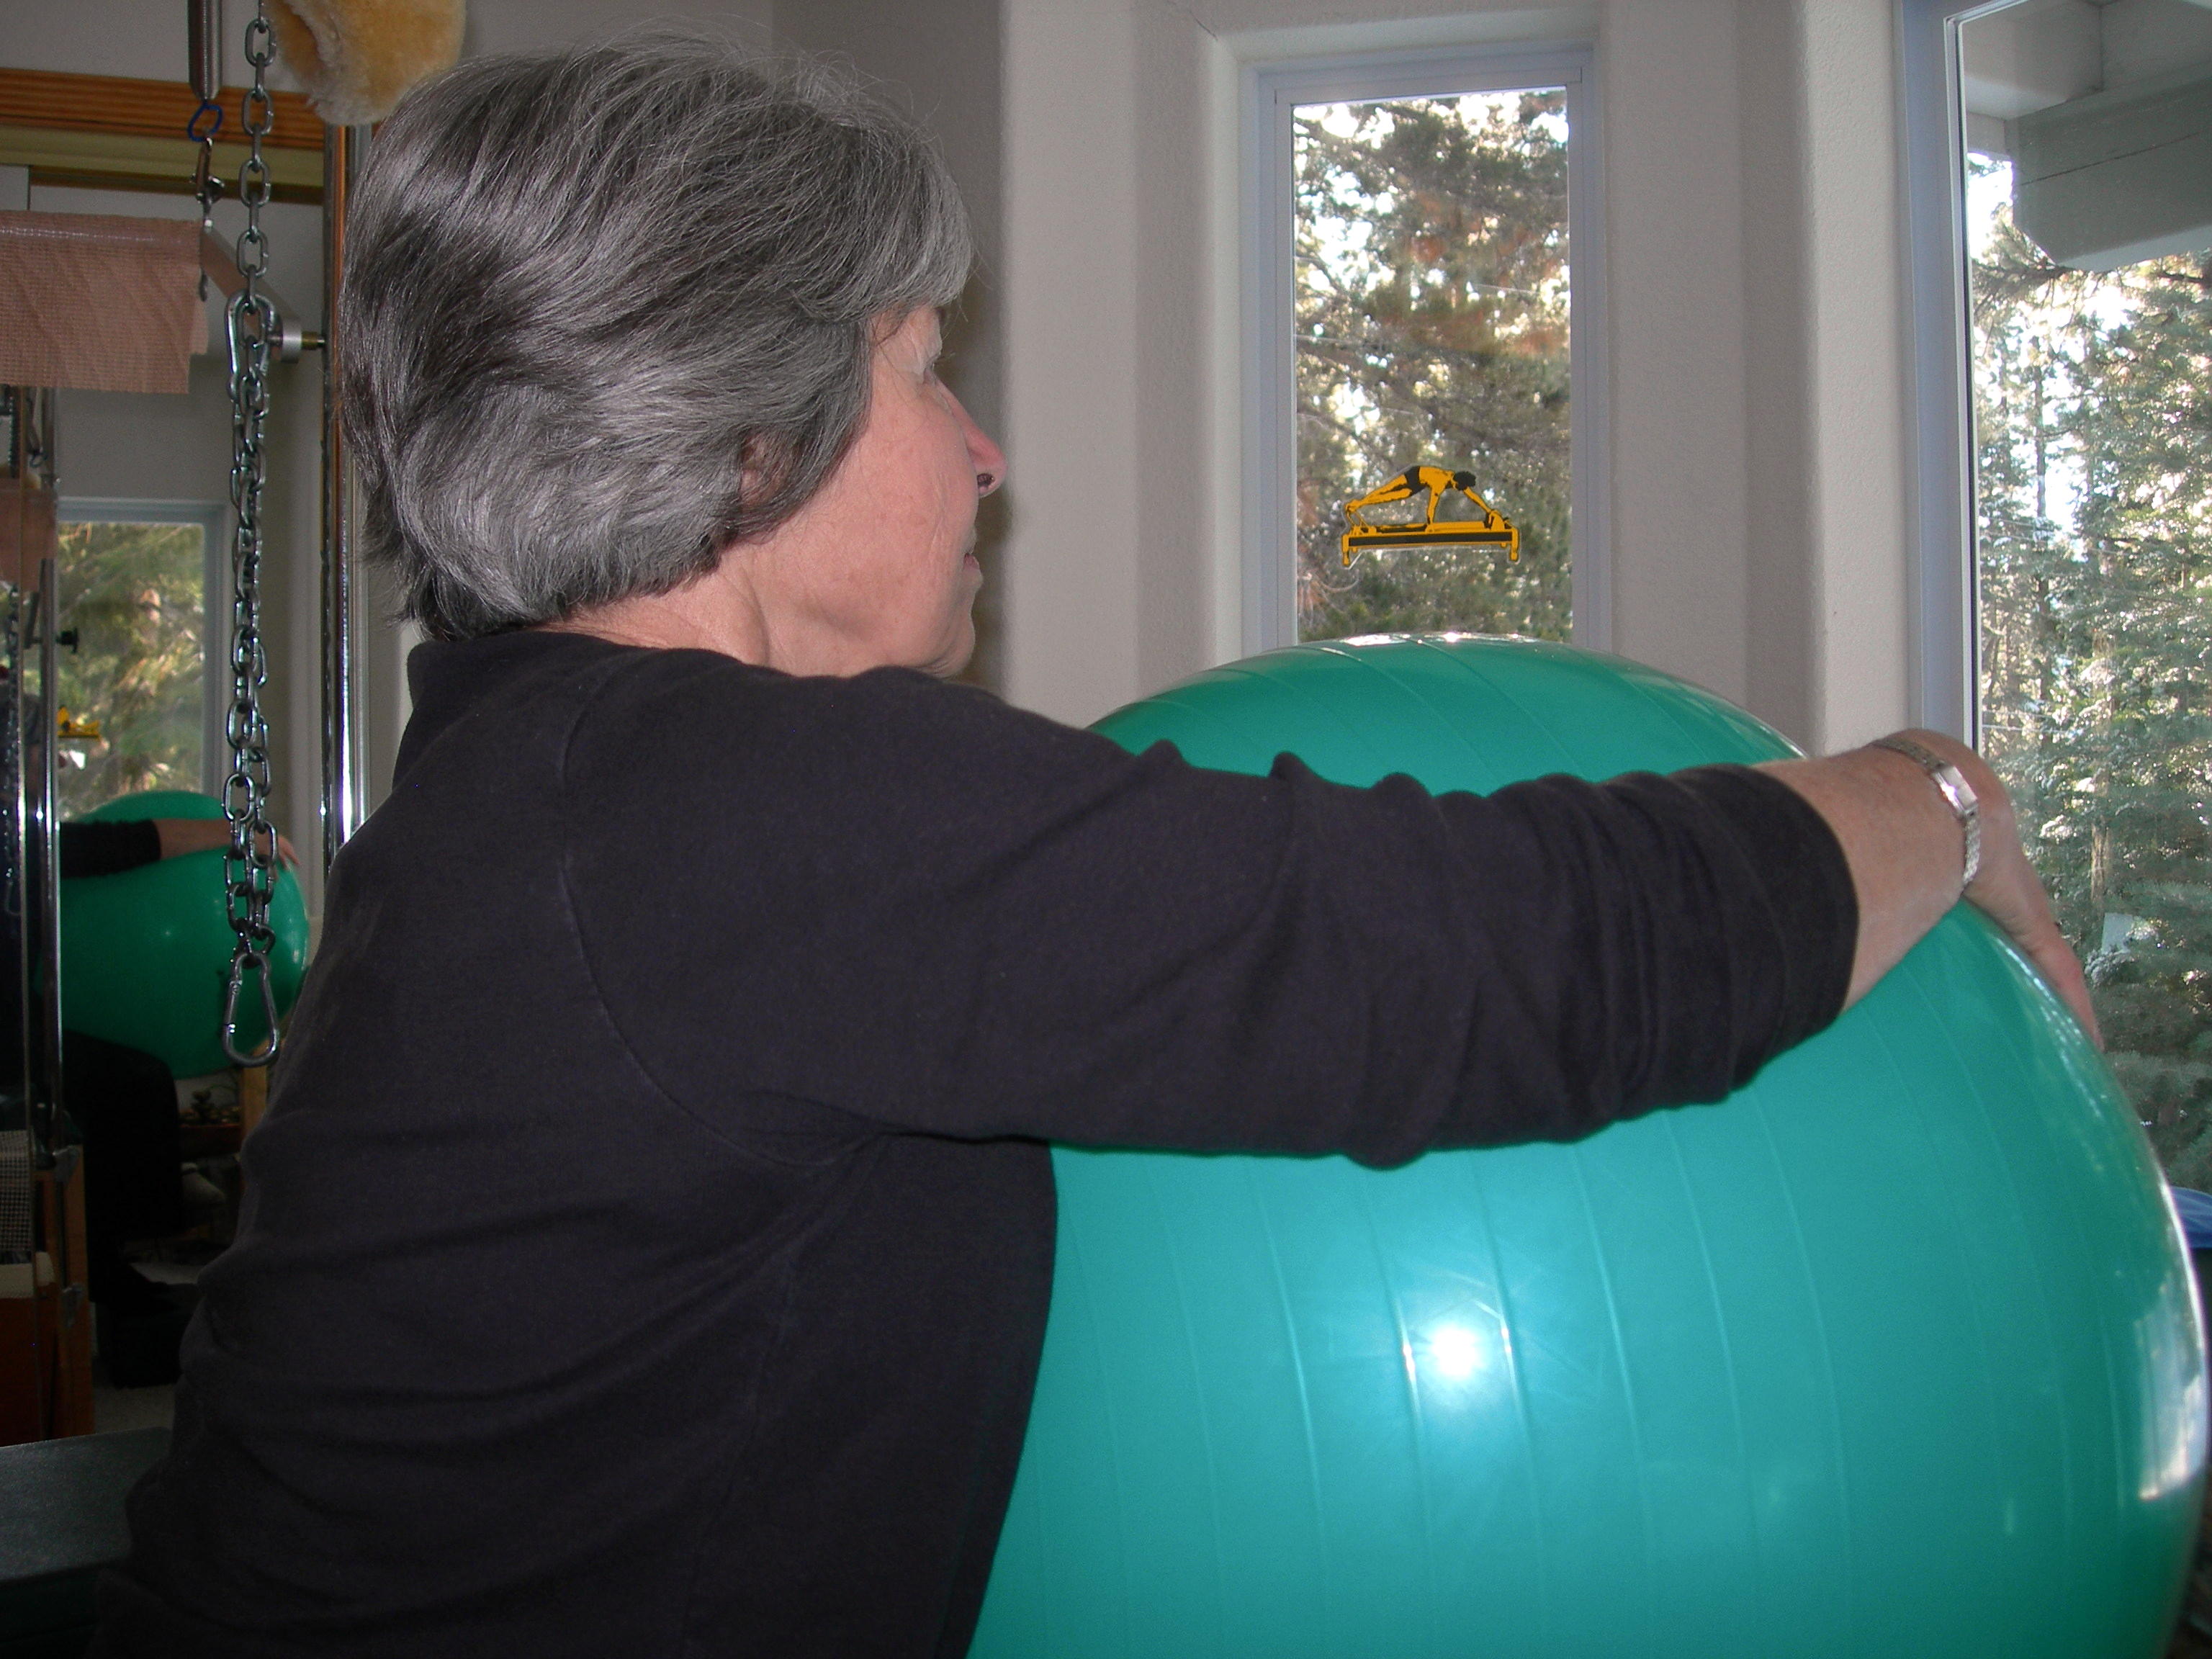
Exercise 4—Physioball
If your client lacks the proprioceptive awareness of chest expansion, it is helpful to sit next to a physioball and lean into it. The physioball gives better feedback as it “dents in” on the inhalation and “pops back” into the ribs on the exhalation. Assist your client to experience breath in the sideways, dorsal and ventral positions by holding the ball pressed toward her body as she breathes. Use a smaller ball than the one pictured if your client has shoulder issues and cannot raise the arm comfortably.
Exercise 5—Marble
Although a full breath in the chest includes breathing into the front of the chest, this can hinder lumbar support when lying supine and holding the legs in the air. When people breathe anteriorly, they often lift the chest off the floor diminishing the supported counter-leverage necessary to hold the legs in the air. Have your client visualize squeezing a marble below the xiphoid process and hold it on the exhalation with the narrowing of the ribs. Suggest that your client take an inhalation without losing the marble. This requires the breath go to the back and to the side of the ribs in a saddle shape. The marble image keeps the thoracic vertebrae pressed into the floor maintaining the strength of the posterior pelvic tilt and support for the lumbar region.
Exercise 6—Elevator
The activation of the transversus abdominis or concept of “navel to spine” requires a cumulative response that evolves and deepens on each exhale. Clients will often tighten the abs in a bracing action as if waiting for a punch to the gut. This is a static engagement and works from the outside in. The transversus abdominis should initiate from the inside, as if the organs are inviting the abdominal wall inward. Guide your client to imagine the abdomen as an elevator. Keep the abdominals engaged holding the elevator level to let the people in on the inhalation (using a costal breath). As she exhales lower the elevator from the 3rd floor to the 2nd floor and feel the navel drop toward the spine in a relaxed action as if a soufflé were to sink in. Hold the elevator still on the next intake of air and exhale again to the 1st floor.
The work phase takes place on the inhalation trying to prevent the belly from expanding and the relaxation occurs during the exhalation deepening the scoop. Any cumulative image will work. For example, deep sea diving going lower and looking at fish; scooping ice cream toward the bottom of the container, etc.
Exercise 7—Segmented vs. Nonsegmented Breath
The 100s breathing can be done in either a continuous regular breath or a segmented breath. The regular breath would include 5 arm pumps on the inhalation and 5 arm pumps during the exhalation. There is also an option to make the breath more percussive inhaling for 5 “sniffs” and exhaling for 5 “candle flickers.” The sniff should have a quality smelling something pleasant (not sniffing a nasal spray) and the blowing out the mouth should be like blowing a candle to watch it flicker, but not blow it out entirely. During the inhalation the ribcage should open and expand into the back with each sniff (as in the “Marble” exercise) and the belly should scoop and deepen during the exhalation (as in the “Elevator” exercise). This percussive breathing can contribute to the invigorating characteristic of the 100s preparing the body for further movement, but for some the saturation of too many details can cause confusion. Choose as needed.
ABDOMINALS
The posterior pelvic tilt or “flat back” position in the 100s occurs in an ordered sequence of abdominal muscle recruitment. If the pelvic tilt is taken in steps, instead of in one action, the low back can lengthen while the abdominals shorten in the front. In contrast, if the low back is pressed into the floor without first tractioning the lumbar vertebrae apart, it creates gripping tension and restricts the ability to scoop the navel toward the spine. My clients have expressed that this sequence gives them a deeper core connection.
Inhale
Step One: Inhale
Take a costal breath expanding the ribcage and using the marble image outlined above, while holding the abdominal wall flat.
Exhale
Step Two: Pelvic Floor with Transversus Abdominis
Engage the pelvic floor at the same time as the transversus abdominis pulling the pubic bone toward the throat (sinking the soufflé as in the “Elevator” exercise). If your client has no experience with engaging the pelvic floor, the direction to stop gas and urination without squeezing the gluts can be helpful. This step happens on the beginning of the exhalation and should feel fairly relaxed. The pelvis will begin to shift into the posterior tilt, but only slightly.
Step Three: Lengthen the Spine and Clamp the Obliques
Direct the head and the tailbone to pull apart from each other to traction the lumbar vertebrae while the obliques bilaterally contract. This action takes place during the middle of the exhalation and should have a strong squeezing or cinching feel to shorten and contract the ribs toward the hipbones while lengthening the low back. The pelvis now moves into a full posterior pelvic tilt.
Step Four: Imprint
Once the above is achieved the low back should have full contact with the floor and an imprint of the lumbar spine is explored. This step occurs at the end of the exhalation and a firm connection with the floor can be felt.
Without releasing the pelvic tilt, begin the process over again until as deep a scoop as possible is achieved (see “Elevator” exercise above).
POWERING THE ARMS
All Pilates exercises include initiation from the core prior to powering the limbs. The pumping arms in the 100s must start from the connection into the back, not the hands going up and down. Firing the lower trapezius, posterior rotator cuff and triceps will intensify the striking action of the arm pump. The arms should not feel like they are slapping, but rather they should be pressing isometrically against imagined thick space such as pressing into peanut butter in a rapid motion.
Exercise 1—Depression of Scapula
Have your client lie supine vertically along a foam roller (or on the floor if you don’t have one). Raise the right hand in the air toward the ceiling and be sure your client feels the scapula either hugging the roller or on the floor and the humerus bone is weighted in the glenohumeral joint. Elevate the scapula and squeeze the shoulder toward the ear staying connected with either the roller or floor. Lower the scapula to a neutral position relaxing the upper trapezius and then further depress the scapula with the intention of activating the lower trapezius. You may need to put your finger on the target so your client feels the inferior angle of the scapula pressing into you. Once your client feels the lower trapezius activate, have her hold the position and isometrically engage it further to increase awareness. Repeat on the left side and then do both at the same time.
Exercise 2—Posterior Rotator Cuff
Have your client bend her elbows in front of her body to ninety degrees palms up as if holding a large tray. Stand behind your client and place the fingers of your left hand below the inferior angle of the right scapula and your right hand on her right shoulder with the thumb pressing into the infraspinatus and teres minor muscles. Ask your client to externally rotate the right shoulder while holding the connection at the posterior rotator cuff and lower trapezius. The elbow has a slightly forward scooping feeling, and the ribs should not release. Repeat this exercise on the other side. After completing both sides ask your client to sit with her arms by her sides and hands on the thighs with the palms up. See if she can widen at the clavicles while pleasantly activating the posterior rotator cuff muscles without letting the ribs protrude. Another option is to have your client hold a scarf or piece of fabric around the mid-back doing the exact same exercise above so that the angle of the arm becomes clearer and provides a little resistance at the elbow.
Exercise 3—Triceps in Upside Down 100s
Performing the 100s in a prone position causes the triceps to go against gravity and activate more intensely. The depression of the scapula and firing of the posterior rotator cuff can also be felt more acutely in this position. Instead of pumping the arms toward the floor, your client will now be pumping the arms to the ceiling doing the exact same 100s exercise while lying prone and scooping the belly off the floor instead of imprinting into the floor. If your client does not experience neck problems, she can activate the back extensors to lift her head an inch or two off the floor keeping the gaze down to maintain the neck alignment. When the exercise is flipped back to the normal supine position, the client is able to feel a better core connection with an increase in isometric effort.
Be sure to modify the 100s to accommodate your client’s needs.
Neck Issues
The entire 100s exercise can be done keeping the head on the floor.
Low Back Pain
One or both feet can keep contact with the floor.
Hip Flexor Discomfort
Keep the feet on the floor or bend the knees in the air keeping them close to the chest.
Rounded Shoulders
The palms can be flipped to face the ceiling on the pump to work more external rotation of the shoulder.
Difficulty Getting to the Floor
The 100s can be performed standing alternating legs after fifty pumps or performed seated.
Advanced Challenges
If you want to challenge your client, try the 100s while lying vertical on a half or full foam roller. Do the first half of the exercise with one leg in the air and then exchange legs for the second half. A BOSU can also be used to challenge your client’s skills performed in a supine position with the low back on the arc of the dome.
The Hundred is a Pilates basic, but can be a coordination nightmare for some new students. Make it easier for your clients to integrate the components by breaking it down into simpler more digestible parts. As with any good building project, start with a solid foundation. Practice breath, abdominal acuity and scapular awareness to build a “power house” that is all about the core.
Tibetan Singing Bowls are a great option for finishing a session with your client to leave her feeling centered, relaxed, and rewarded. These bowls from the Himalayan region are made from a combination of metals (bronze alloy, copper, tin, zinc, iron and sometimes other metals depending upon the age of the bowl) and produce vibrating tones when struck or circled along the circumference of the bowl’s rim with a mallet. They are used in yoga classes, holistic sound therapy, chakra re-balancing and personal meditation. Singing bowls produce a calming effect and reinforce the concept of living in the present moment.
The pitch varies on the size and thickness of the bowl, and is played with a wooden stick that creates friction around the rim of the bowl like a wet finger would around a wineglass. The sound changes when using felt covered strikers on the side of the bowl giving it a lower tone. A less metallic sound is also possible using a suede covered mallet. Bowls come in small, medium and large sizes with and without decoration. It is easy to learn how to play them and requires only a quick demonstration on the technique of holding the mallet and how to apply pressure to the side of the bowl.
When the bowls are placed on the chakras they allow the individual to hone in on the energy centers of the body. Although each note is linked to a chakra, relaxation and centering can occur whether or not this pattern is followed. When you buy a bowl, it should specify what notes are played with the striker and mallet. Starting at the 1stchakra the notes correspond in ascending order as C, D, E, F, G, A, and B at the 7thchakra. Although it is helpful to have an understanding of the chakra systems to direct one’s energy and attention, the balancing effect will take place regardless. I tend to place my Tibetan Singing Bowls on a client by size rather than the specific note rendered since the notes played blend together harmoniously.
The calming vibration takes the mind from a cerebral analytical state to an emotional experiential state effectively diminishing internal mind chatter. For those “Type A” personalities, it is truly a gift to get out of one’s head and experience the state of “being-ness.” The opportunity to slow down and recover after a physical workout helps your client transition into the next activity of the day with relaxation and greater ability to focus.
I have also used bowls to finish a group mat class with a guided meditation and have received positive feedback from students. I place the bowls in the center of the room and have the class lie on the floor on their mats like spokes on a wheel with their heads toward the center to clearly hear the sounds. I have even used my bowls in the hospital when my mother was recovering from a traumatic surgery (obviously not near the wound). Now when I go to visit her, she still asks me to bring them because she wants to repeat the relaxing experience.
If there is time at the end of a session I will sometimes do what I call the “spa finish.” I have the client lie supine on the Cadillac with legs propped up on the short box from the Reformer if it is more comfortable. I heat a neck wrap in a microwave and place it around the client’s neck with a lavender eye-cover (ask if lavender is okay—not everyone likes it). I will sometimes cover the person with a heavy blanket to create a swaddling cocoon. I vary the placement of the bowls and how I play them depending on the emotional state of my client using my intuition as a guide. Striking a bowl under the table, one on the chest and playing another one above the body can create a tiered-effect. Occasionally wait for the vibration to stop before playing the next bowl. This silence can align the client with stillness and greater awareness of the present moment.
Pilates is highly adaptable to all skill-levels, but should appropriately challenge your client physically and mentally. After providing your client with this stimulating movement experience, it is helpful to provide some kind of relaxing or centering ritual to finish. There are many ways to end a session, but Tibetan Singing Bowls just might leave your client singing your praises.

 old the extra large bath towel in half lengthwise and then roll up opposite ends (like 2 tootsie rolls) until one rolls in about 1/3 of the way in and the other side rolls in about 2/3. The rounded ends should meet rolled in together with one side larger creating an evenly sloped angle, rather than two distinct steps of differing heights. This is going to be the main support under the upper thoracic spine, and your client should lie on this towel corresponding approximately to thoracic segments 3-6 with the lower side toward the neck. A good check is to look at the base of the sternum and make sure the towel is situated above the xiphoid process. It is important to place this towel correctly to open the area of sternal concavity found in rounded back posture and to avoid overextension of the lumbar region. I use a small heating pad over this towel to help relax the back muscles.
 lengthwise and then roll it up completely to make a tootsie roll shape. Place this towel under the neck. Be sure you see a gradual descent from the lifted chest to the crown with mild extension of the upper chest to minimize the intensity of holding the position. I sometimes also use a heated microwavable neck wrap going from the back of the neck around the shoulders, but the alignment of the chest, neck and head must be maintained. A lavender-scented eye cover is also nice if your client does not suffer from allergies or claustrophobia.
 o elevate your client’s legs to prevent low back pain that could occur from the pressure on the lumbar region in this position. The Reformer Long Box works great for this and should be placed widthwise under your client’s legs comfortably meeting the crease behind the knees. Ask your client what furniture at home might replicate the size of the box (an ottoman, stool, low table or pillows).

 nsion, it is helpful to sit next to a physioball and lean into it. The physioball gives better feedback as it “dents in” on the inhalation and “pops back” into the ribs on the exhalation. Assist your client to experience breath in the sideways, dorsal and ventral positions by holding the ball pressed toward her body as she breathes. Use a smaller ball than the one pictured if your client has shoulder issues and cannot raise the arm comfortably.


 Tibetan Singing Bowls
 If there is time at the end of a session I will sometimes do what I call the “spa finish.” I have the client lie supine on the Cadillac with legs propped up on the short box from the Reformer if it is more comfortable. I heat a neck wrap in a microwave and place it around the client’s neck with a lavender eye-cover (ask if lavender is okay—not everyone likes it). I will sometimes cover the person with a heavy blanket to create a swaddling cocoon. I vary the placement of the bowls and how I play them depending on the emotional state of my client using my intuition as a guide. Striking a bowl under the table, one on the chest and playing another one above the body can create a tiered-effect. Occasionally wait for the vibration to stop before playing the next bowl. This silence can align the client with stillness and greater awareness of the present moment.